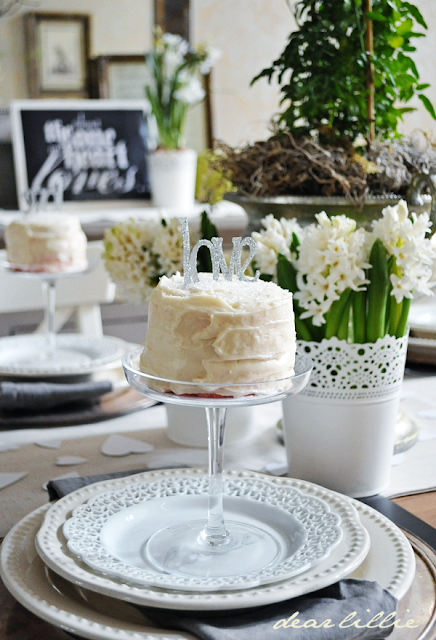
Lillie, Lola and I had some fun making some mini valentine's cakes last week. They make a fun little dessert so I thought I would share how we did it in case anyone wanted to make some. I had seen several ombre cakes on pinterest and thought it would be fun to try! I had planned on making this a four layer cake so we made four different shades of pink but I didn't make them thin enough so we ended up just doing two layers on each cake and ended up making eight two-layer cakes instead of four four-layer cakes. Here's what they looked like when you cut into them:
So, the first thing we did was make the cakes. I love homemade frosting but have to admit I find cake mixes to be better than homemade cake! For this we just used a Betty Crocker yellow cake mix and we added graduation amounts of pink food coloring. We used two cakes mixes so we could make four 9" round cakes, but if I were to do it again I would definitely just use one cake mix and make the layers thinner and maybe make just three 9" round cakes.
For the icing we used my favorite cream cheese frosting that I got from my mom - when we were little this was the frosting she always put in her homemade carrot cake. My parents and sisters loved carrot cake but I was not a fan. I would just eat off the delicious icing and not touch my cake. =) Anyway here is the recipe:
Cream Cheese Frosting:
3 Tbsp. butter
4 to 5 oz. cream cheese
1 tsp. vanilla
1/2 Tbsp. maple syrup (I sometimes do a full tablespoon)
3 cups confectioners sugar
Soften butter and cream cheese then add the rest of the ingredients until they are nice and smooth. Depending on how much icing you like you might want to make a little extra frosting. We like a lot of icing on our cakes. For the two cake mixes we made we doubled the above recipe and it wasn't quite enough. It might have been enough if it weren't for the fact that my helpers and I really like to "sneak" licks of the frosting while we are working. If you just like a light coating of icing and you are making one cake mix for a total of four mini cakes I think the above recipe would be enough. If you like a heavier coating of icing I would recommend doing about one and a half times the above ingredients.
Next I took a the top of a clothing gift box and cut out four circles. I used the circular cookie cutter I was going to use on my cakes to trace and make sure they were the right size:
Now I put one of the cardboard circles on top of an upside down vase so that I would be able to twist around it to frost the cakes (I am sure there are more professional things out there made for this, but I always just use whatever I can find on hand). Then used a knife to trim off the top of my cake a bit so it would be a little flatter and I used my little circular cookie cutter and cut out my first layer. I had two little helpers so this part was a bit messy. =)
I put the first layer on and then added some frosting and then put on the second layer.
Then I just frosted the whole thing with a yummy cream cheese frosting (recipe above) and added a cutout that said love. We added some glittery sprinkles to the cake and some silver glitter to the word love because toddler sized girls LOVE glitter! =) Frosting the cake was a bit difficult partly because I had two little helpers and partly because I probably should have refrigerated the cakes a bit so they didn't crumble so much. I had planned on doing something fancier for the frosting but in the end it was just easier to do a very basic frosting job on these. And yes, I know they are a little on the messy side. =)
If you want to make your own love toppers here is a template for the one we made.
We made four cakes that looked like the one above and then we made a few more layered ones and then Lillie and Lola also did some one layer ones and had lots of fun adding all the sprinkles they wanted on those one.
When we were done we added the four cakes to the four place settings on our table.
I hope you are having a great Sunday! I'll be back tomorrow to show you the rest of our Valentine's decorating.


Tidak ada komentar:
Posting Komentar
Catatan: Hanya anggota dari blog ini yang dapat mengirim komentar.